

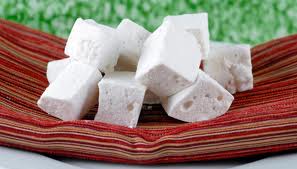
If you have ever received a Christmas platter from me, you’ll have discovered my toasted coconut marshmallows nestled in with the fudge, thumb print cookies and sunflower-pumpkin seed brittle ~ but marshmallows for Easter?!? I am so excited to give these lemon jewels a try! I hope you enjoy these variations from Epicurious.com ~ and the pure joy on the faces of those around you when they exclaim, “Homemade marshmallows?”, then sink in for the extraordinary flavor, sooo unlike their store-bought step-cousins!
I think I’m making vanilla bean marshmallows with homemade, Italian style hot chocolate… it’s just that kind of day!
Happy days and blessings, friends! 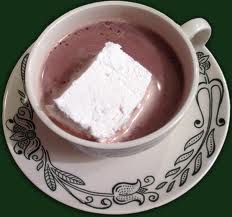
Note: As easy as it would make kitchen time, I do not use (because I don’t have) a stand mixer; still have the old hand-held. I also don’t use (ok, don’t have one of these either!) a candy thermometer. I use my eyeballs & instincts. Just call me cave girl!
The Basic Marshmallow Recipe
Making marshmallows is a quick and easy process, but it involves specific timing and extremely hot sugar, so it helps to get all the equipment ready and the ingredients measured before you begin. Start by using a pastry brush to lightly brush your pan with vegetable oil then use a fine-mesh sieve to dust the pan with confectioners’ sugar.
In the bowl of a stand mixer, dissolve the gelatin in water. Meanwhile, bring the granulated sugar, corn syrup, water, and salt to a boil, while gently stirring to dissolve the sugar. Attach a candy thermometer to the side of the pan, and continue boiling the sugar syrup, without stirring, until it reaches soft-ball stage, or 240°F. Remove the pan from the heat and wait for the bubbles to slightly subside then turn the mixer on low and slowly pour the hot sugar into the gelatin mixture. Gradually increase the mixer speed to high and continue beating for about five minutes or until the mixture is thick and forms a thick ribbon when the whisk is lifted. Beat in the vanilla and then scrape the mixture into the prepared pan, using wet fingers to spread and smooth it.
The next step requires patience: Let the marshmallows stand at room temperature until they are no longer sticky and you can gently pull them away from the sides of the pan. This takes about four hours, but marshmallows can also sit overnight. While it’s not required, you can cover the pan of marshmallows loosely with aluminum foil. Avoid using plastic wrap as it tends to droop and stick to the marshmallows.
Cutting and Storing Marshmallows
When the marshmallows are ready to be cut, dust a cutting board with confectioners’ sugar then use a rubber spatula to pull the marshmallows away from the pan and invert them on to the cutting board. If they stick to the pan, carefully slip a spatula underneath the marshmallows to loosen them. Once they’re turned over on the cutting board, dust the unmolded marshmallows with more confectioners’ sugar. Our recipes call for 1 cup confectioners’ sugar, but you can also use 3/4 cup confectioners’ sugar sifted with ¼ cup cornstarch, a combination that’s slightly better at preventing sticking.
When cutting marshmallows, a long thin knife, such as a 6-inch utility knife, makes the process effortless, but a chef’s knife also works. To prevent sticking, brush the knife with vegetable oil and dust it with confectioners’ sugar—continue dusting the knife with confectioners’ sugar in between cuts as needed. To get 64 bite-size marshmallows, cut the square lengthwise into eight strips, then cut the strips crosswise into eighths. For 36 larger marshmallows, cut the square lengthwise into six strips then cut the strips into sixths. Once the squares are cut, coat them in additional confectioners’ sugar, shaking off any excess.
Store homemade marshmallows, layered between sheets of wax or parchment paper, in an airtight container. If kept in a dry place at cool room temperature, they should keep for about a month. Marshmallows that include mix-ins or that have been dipped in chocolate will have a slightly shorter shelf life.
LEMON MARSHMALLOWS
Brush the bottom and sides of a 9-inch square baking pan with vegetable oil. Using a small, fine-mesh sieve, dust the pan generously with confectioners’ sugar, knocking out any excess.
Using a vegetable peeler, remove the zest from the lemons in strips then use a small sharp knife to remove any white pith from the undersides of the zest. Reserve the lemons. Finely chop the zest then transfer to the bowl of a food processor and add the granulated sugar. Process until the zest is finely ground, 1 to 2 minutes.
Squeeze and strain enough juice from the lemons to measure 1/2 cup and transfer to the bowl of a stand mixer fitted with the whisk attachment. Add 2 tablespoons water, then sprinkle gelatin into the bowl and stir briefly to make sure all the gelatin is in contact with the lemon juice and water. Let soften while you make the sugar syrup.
In a heavy 3- to 4-quart saucepan, combine the zest-sugar mixture with the corn syrup, salt, and 1/2 cup water. Place over moderate heat and bring to a boil, stirring until the sugar is dissolved. Put a candy thermometer into the boiling sugar syrup and continue boiling (the mixture may foam up, so turn the heat down slightly if necessary), without stirring, until the thermometer registers 240°F (soft-ball stage). Remove the saucepan from the heat and let stand briefly until the bubbles dissipate slightly.
With the mixer on low speed, pour the hot sugar syrup into the softened gelatin in a thin stream down the side of the bowl. Gradually increase the mixer speed to high and beat until the marshmallow is very thick and forms a thick ribbon when the whisk is lifted, about 5 minutes. Beat in the food coloring, adding more for a darker yellow color.
Scrape the marshmallow into the prepared pan (it will be very sticky) and use wet fingertips to spread it evenly and smooth the top. Let stand, uncovered at room temperature, until the surface is no longer sticky and you can gently pull the marshmallow away from the sides of the pan with your fingertips, at least 4 hours or overnight.
Dust a cutting board with confectioners’ sugar. Use a rubber spatula to pull the sides of the marshmallow from the edge of the pan (use the spatula to loosen the marshmallow from the bottom of the pan if necessary) and invert onto the cutting board. Dust the top with confectioners’ sugar. Brush a long thin knife or a chef’s knife with vegetable oil and dust with confectioners’ sugar to prevent sticking; continue dusting the knife as necessary. Cut lengthwise into 8 strips, then crosswise into eighths, to form a total of 64 squares. (For larger marshmallows, cut lengthwise into 6 strips, then crosswise into sixths, to form a total of 36 squares.) Coat marshmallows, one at a time, in confectioners’ sugar, using a pastry brush to brush off any excess. DO AHEAD: Marshmallows can be stored, layered between sheets of wax paper or parchment in an airtight container in a dry place at cool room temperature, for 1 month.
BOURBON-VANILLA MARSHMALLOWS
- 3 vanilla beans, split lengthwise
- About 1 cup confectioners’ sugar for making vanilla sugar
- 1 tablespoon bourbon
- Vegetable oil for brushing pan
- 3 (1/4-ounce) envelopes powdered unflavored gelatin
- 1 1/2 cups granulated sugar
- 1 cup light corn syrup
- 1/4 teaspoon salt
Using a small, sharp knife split the vanilla beans lengthwise and scrape the seeds into a small bowl. Reserve the vanilla bean pods. Transfer about one-third of the seeds to a second small bowl and add 1 tablespoon confectioners’ sugar. Using a mortar or the back of a spoon, pound and mix together. Add the remaining confectioners’ sugar and stir to combine. Cover and let stand at least 1 hour. DO AHEAD: Vanilla sugar can be made ahead and stored, in an airtight container at room temperature, indefinitely.
Add the bourbon to the remaining vanilla seeds and whisk to disperse the seeds. Set aside.
Brush the bottom and sides of a 9-inch square baking pan with vegetable oil. Using a small, fine-mesh sieve, dust the pan generously with the vanilla sugar, knocking out any excess.
Put 1/2 cup water in the bowl of a stand mixer fitted with the whisk attachment. Sprinkle the gelatin into the bowl and stir briefly to make sure all the gelatin is in contact with water. Let soften while you make the sugar syrup.
In a heavy 3- to 4-quart saucepan, combine the granulated sugar, corn syrup, salt, and 1/2 cup water. Place over moderate heat and bring to a boil, stirring until the sugar is dissolved. Add the scraped vanilla bean pods to the pot then put a candy thermometer into the boiling sugar syrup and continue boiling (the mixture may foam up, so turn the heat down slightly if necessary), without stirring, until the thermometer registers 240°F (soft-ball stage). Remove the saucepan from the heat and let stand briefly until the bubbles dissipate slightly. Using tongs, carefully remove the vanilla bean pods and discard.
With the mixer on low speed, pour the hot sugar syrup into the softened gelatin in a thin stream down the side of the bowl. Gradually increase the mixer speed to high and beat until the marshmallow is very thick and forms a thick ribbon when the whisk is lifted, about 5 minutes. Whisk the bourbon–vanilla seed mixture to disperse the seeds, then add to the marshmallow and beat until incorporated.
Scrape the marshmallow into the prepared pan (it will be very sticky) and use wet fingertips to spread it evenly and smooth the top. Let stand, uncovered at room temperature, until the surface is no longer sticky and you can gently pull the marshmallow away from the sides of the pan with your fingertips, at least 4 hours or overnight.
Dust a cutting board with vanilla sugar. Use a rubber spatula to pull the sides of the marshmallow from the edge of the pan (use the spatula to loosen the marshmallow from the bottom of the pan if necessary) and invert onto the cutting board. Dust the top with vanilla sugar. Brush a long thin knife or a chef’s knife with vegetable oil and dust with vanilla sugar to prevent sticking; continue dusting the knife as necessary. Cut lengthwise into 8 strips, then crosswise into eighths, to form a total of 64 squares. (For larger marshmallows, cut lengthwise into 6 strips, then crosswise into sixths, to form a total of 36 squares.) Coat marshmallows, one at a time, in confectioners’ sugar, using a pastry brush to brush off any excess. DO AHEAD: Marshmallows can be stored, layered between sheets of wax paper or parchment in an airtight container in a dry place at cool room temperature, for 1 month.
Oh, darn! These next morsels, when dipped, only keep for 2 days… guess you’ll have to eat them all (or share)!
CHOCOLATE-DIPPED CREME DE MENTHE MARSHMALLOWS
- Vegetable oil for brushing pan
- About 1 cup confectioners’ sugar for coating pan and marshmallows
- 3 tablespoons crème de menthe
- 3 (1/4-ounce) envelopes powdered unflavored gelatin
- 1 1/2 cups granulated sugar
- 1 cup light corn syrup
- 1/4 teaspoon salt
- 1 teaspoon peppermint extract
- 1/4 teaspoon (about 25 drops) green food coloring (preferably organic), or more as desired
- About 6 ounces bittersweet chocolate, finely chopped
- 1 1/2 tablespoons vegetable shortening, preferably trans-fat-free
Brush the bottom and sides of a 9-inch square baking pan with vegetable oil. Using a small, fine-mesh sieve, dust the pan generously with confectioners’ sugar, knocking out any excess.
Put 1/3 cup water and crème de menthe in the bowl of a stand mixer fitted with the whisk attachment. Sprinkle the gelatin into the bowl and stir briefly to make sure all the gelatin is in contact with water and crème de menthe. Let soften while you make the sugar syrup.
In a heavy 3- to 4-quart saucepan, combine the granulated sugar, corn syrup, salt, and 1/2 cup water. Place over moderate heat and bring to a boil, stirring until the sugar is dissolved. Put a candy thermometer into the boiling sugar syrup and continue boiling (the mixture may foam up, so turn the heat down slightly if necessary), without stirring, until the thermometer registers 240°F (soft-ball stage). Remove the saucepan from the heat and let stand briefly until the bubbles dissipate slightly.
With the mixer on low speed, pour the hot sugar syrup into the softened gelatin in a thin stream down the side of the bowl. Gradually increase the mixer speed to high and beat until the marshmallow is very thick and forms a thick ribbon when the whisk is lifted, about 5 minutes. Beat in the peppermint extract and the green food coloring, adding more for a darker green color.
Scrape the marshmallow into the prepared pan (it will be very sticky) and use wet fingertips to spread it evenly and smooth the top. Let stand, uncovered at room temperature, until the surface is no longer sticky and you can gently pull the marshmallow away from the sides of the pan with your fingertips, at least 4 hours or overnight.
Dust a cutting board with confectioners’ sugar. Use a rubber spatula to pull the sides of the marshmallow from the edge of the pan (use the spatula to loosen the marshmallow from the bottom of the pan if necessary) and invert onto the cutting board. Dust the top with confectioners’ sugar. Brush a long thin knife or a chef’s knife with vegetable oil and dust with confectioners’ sugar to prevent sticking; continue dusting the knife as necessary. Cut lengthwise into 8 strips, then crosswise into eighths, to form a total of 64 squares. (For rectangular marshmallows, cut lengthwise into 8 strips, then crosswise into fourths, to form a total of 32 rectangles.) Coat marshmallows, one at a time, in confectioners’ sugar, using a pastry brush to brush off any excess.
In a dry metal bowl set over a pan of barely simmering water, melt the chocolate and shortening, stirring until smooth. Working with one marshmallow at a time, brush the marshmallow again to remove any excess confectioners’ sugar then dip one smooth side about 1/8 inch into the chocolate to coat it, scraping any excess chocolate on the edge of the bowl. Transfer, chocolate side up, to a wire rack set over a baking sheet and let stand until the chocolate is set. DO AHEAD: Marshmallows—without chocolate—can be stored, layered between sheets of wax paper or parchment in an airtight container in a dry place at cool room temperature, for 1 month. Chocolate-dipped marshmallows can be stored in the same manner, but will only keep for about 2 days.

Thank you for recommending my blog to your readers – hoppy Easter blessings, my blogging friend!
LikeLike